MySQL을 로컬에서만 사용하다 외부접속으로 해서 뭔가 쿼리를 날리다보면 패킷레벨에서 다 오픈되니까 불안하다.
mysql도 기타 다른 서버들 처럼 ssl 위에서 접속하게 하는 방법이다.
아래 설명은 우분투 20.04의 MariaDB 10.3.22 버전 기준인데.. 오래된 라즈베리파이의 10.1.44 에서도 똑같이 적용되는거보니
10.X버전에선 별 차이 없을거같다.
1. 현재 DB상태파악
root@server:/etc/mysql/certs# mysql -uroot -p
Welcome to the MariaDB monitor.  Commands end with ; or \g.
Your MariaDB connection id is 691
Server version: 10.3.22-MariaDB-1ubuntu1-log Ubuntu 20.04

Copyright (c) 2000, 2018, Oracle, MariaDB Corporation Ab and others.

Type 'help;' or '\h' for help. Type '\c' to clear the current input statement.

MariaDB [(none)]> select version();
+------------------------------+
| version()                    |
+------------------------------+
| 10.3.22-MariaDB-1ubuntu1-log |
+------------------------------+
1 row in set (0.000 sec)

MariaDB [(none)]> show variables like '%ssl%';
+---------------------+-------------+
| Variable_name       | Value       |
+---------------------+-------------+
| have_openssl        | NO          |
| have_ssl            | DISABLED    |
| ssl_ca              |             |
| ssl_capath          |             |
| ssl_cert            |             |
| ssl_cipher          |             |
| ssl_crl             |             |
| ssl_crlpath         |             |
| ssl_key             |             |
| version_ssl_library | YaSSL 2.4.4 |
+---------------------+-------------+
10 rows in set (0.002 sec)
MariaDB [(none)]>
위처럼 아무 설정을 안했다면 have_ssl 로 disabled 로 되어 있다. 이는 ssl이 지원되지만 enable 되지 않았다는 뜻.
version_ssl_library 는 openssl 이 아닌 yaSSL 을 쓰는걸로 되어 있는데 저걸 써도 상관없다.
2. DB에 SSL 지원준비
/etc/mysql/mariadb.conf.d/50-server.cnf
을 열어 #ssl-ca=... 부분을 찾아 그 위에 ssl을 추가하고 저장한다
#
# For generating SSL certificates you can use for example the GUI tool "tinyca".
#
ssl
#ssl-ca=...
mariadb 재시작
service mariadb restart
mysql 에 재접속해서 다시 variables 를 조회했을때 have_ssl 에 YES로 바뀌어 있으면
SSL 지원준비는 완료되었다.
MariaDB [(none)]> show variables like '%ssl%';
+---------------------+-------------+
| Variable_name       | Value       |
+---------------------+-------------+
| have_openssl        | NO          |
| have_ssl            | YES         |
| ssl_ca              |             |
| ssl_capath          |             |
| ssl_cert            |             |
| ssl_cipher          |             |
| ssl_crl             |             |
| ssl_crlpath         |             |
| ssl_key             |             |
| version_ssl_library | YaSSL 2.4.4 |
+---------------------+-------------+
10 rows in set (0.01 sec)

MariaDB [(none)]>
3. 인증서 생성
$ mkdir /etc/mysql/certs
$ cd /etc/mysql/certs
$ openssl genrsa 2048 > ca-key.pem
Generating RSA private key, 2048 bit long modulus (2 primes)
.........+++++
.................................+++++
e is 65537 (0x010001)
$ openssl req -new -x509 -nodes -days 365000 -key ca-key.pem -out ca-cert.pem
You are about to be asked to enter information that will be incorporated
into your certificate request.
What you are about to enter is what is called a Distinguished Name or a DN.
There are quite a few fields but you can leave some blank
For some fields there will be a default value,
If you enter '.', the field will be left blank.
-----
Country Name (2 letter code) [AU]:
State or Province Name (full name) [Some-State]:
Locality Name (eg, city) []:
Organization Name (eg, company) [Internet Widgits Pty Ltd]:
Organizational Unit Name (eg, section) []:
Common Name (e.g. server FQDN or YOUR name) []:MariaDB Admin
Email Address []:
위의 밑에서 2번째줄 Common Name 에 주의
3-2) 서버용 인증서 생성
$ openssl req -newkey rsa:2048 -days 365000 -nodes -keyout server-key.pem -out server-req.pem
Ignoring -days; not generating a certificate
Generating a RSA private key
..................+++++
..+++++
writing new private key to 'server-key.pem'
-----
You are about to be asked to enter information that will be incorporated
into your certificate request.
What you are about to enter is what is called a Distinguished Name or a DN.
There are quite a few fields but you can leave some blank
For some fields there will be a default value,
If you enter '.', the field will be left blank.
-----
Country Name (2 letter code) [AU]:
State or Province Name (full name) [Some-State]:
Locality Name (eg, city) []:
Organization Name (eg, company) [Internet Widgits Pty Ltd]:
Organizational Unit Name (eg, section) []:
Common Name (e.g. server FQDN or YOUR name) []:MairaDB Server
Email Address []:

Please enter the following 'extra' attributes
to be sent with your certificate request
A challenge password []:
An optional company name []:
$ openssl rsa -in server-key.pem -out server-key.pem
writing RSA key
$ openssl x509 -req -in server-req.pem -days 365000 -CA ca-cert.pem -CAkey ca-key.pem -set_serial 01 -out server-cert.pem
Signature ok
subject=C = AU, ST = Some-State, O = Internet Widgits Pty Ltd, CN = MairaDB Server
Getting CA Private Key
$
3-3) 클라이언트용 인증서 생성
$  openssl req -newkey rsa:2048 -days 365000 -nodes -keyout client-key.pem -out client-req.pem
Ignoring -days; not generating a certificate
Generating a RSA private key
......+++++
...............................................................................................................................+++++
writing new private key to 'client-key.pem'
-----
You are about to be asked to enter information that will be incorporated
into your certificate request.
What you are about to enter is what is called a Distinguished Name or a DN.
There are quite a few fields but you can leave some blank
For some fields there will be a default value,
If you enter '.', the field will be left blank.
-----
Country Name (2 letter code) [AU]:
State or Province Name (full name) [Some-State]:
Locality Name (eg, city) []:
Organization Name (eg, company) [Internet Widgits Pty Ltd]:
Organizational Unit Name (eg, section) []:
Common Name (e.g. server FQDN or YOUR name) []:MairaDB Client
Email Address []:

Please enter the following 'extra' attributes
to be sent with your certificate request
A challenge password []:
An optional company name []:
$ openssl rsa -in client-key.pem -out client-key.pem
writing RSA key
$ openssl x509 -req -in client-req.pem -days 365000 -CA ca-cert.pem -CAkey ca-key.pem -set_serial 01 -out client-cert.pem
Signature ok
subject=C = AU, ST = Some-State, O = Internet Widgits Pty Ltd, CN = MairaDB Client
Getting CA Private Key
$
3-4) 생성된 인증서 검증
$ ls -al
total 40
drwxr-xr-x 2 root root 4096  7월 11 18:02 .
drwxr-xr-x 6 root root 4096  7월 11 17:46 ..
-rw-r--r-- 1 root root 1314  7월 11 17:51 ca-cert.pem
-rw-r--r-- 1 root root 1675  7월 11 17:49 ca-key.pem
-rw-r--r-- 1 root root 1168  7월 11 18:02 client-cert.pem
-rw------- 1 root root 1679  7월 11 18:01 client-key.pem
-rw-r--r-- 1 root root  993  7월 11 18:01 client-req.pem
-rw-r--r-- 1 root root 1168  7월 11 17:59 server-cert.pem
-rw------- 1 root root 1675  7월 11 17:58 server-key.pem
-rw-r--r-- 1 root root  993  7월 11 17:58 server-req.pem
$ openssl verify -CAfile ca-cert.pem server-cert.pem client-cert.pem
server-cert.pem: OK
client-cert.pem: OK
$
3-5) mysql 서버가 접근가능하게 인증서 파일 소유를 mysql:mysql로 변경
$ chown -R mysql:mysql /etc/mysql/certs
4. 서버 설정
/etc/mysql/mariadb.conf.d/50-server.cnf
#
# For generating SSL certificates I recommend the OpenSSL GUI "tinyca".
#

ssl
ssl-ca=/etc/mysql/certs/ca-cert.pem
ssl-cert=/etc/mysql/certs/server-cert.pem
ssl-key=/etc/mysql/certs/server-key.pem
을 열어 #ssl- 로 주석처리된 부분에서 주석을 지우고 위처럼 변경하고 mariadb 재시작
$ service mariadb restart
5. 서버 SSL 상태 확인
$ service mariadb restart
$ mysql -uroot -p
Enter password:
Welcome to the MariaDB monitor.  Commands end with ; or \g.
Your MariaDB connection id is 214
Server version: 10.3.22-MariaDB-1ubuntu1-log Ubuntu 20.04

Copyright (c) 2000, 2018, Oracle, MariaDB Corporation Ab and others.

Type 'help;' or '\h' for help. Type '\c' to clear the current input statement.

MariaDB [(none)]> show variables like '%ssl%';
+---------------------+----------------------------------+
| Variable_name       | Value                            |
+---------------------+----------------------------------+
| have_openssl        | NO                               |
| have_ssl            | YES                              |
| ssl_ca              | /etc/mysql/certs/ca-cert.pem     |
| ssl_capath          |                                  |
| ssl_cert            | /etc/mysql/certs/server-cert.pem |
| ssl_cipher          |                                  |
| ssl_crl             |                                  |
| ssl_crlpath         |                                  |
| ssl_key             | /etc/mysql/certs/server-key.pem  |
| version_ssl_library | YaSSL 2.4.4                      |
+---------------------+----------------------------------+
10 rows in set (0.002 sec)

MariaDB [(none)]>
이렇게 표시되면 서버측에서 SSL 지원 준비는 끝났다.
6. 서버에 SSL 외부접속 사용자 추가
SSL 로만 외부접속을 허용하는 사용자를 추가해서 설정이 제대로 동작하는지 테스트 해보자.
MariaDB [(none)]> CREATE USER 'ssluser'@'%' IDENTIFIED BY '패스워드';
Query OK, 0 rows affected (0.000 sec)

MariaDB [(none)]> GRANT ALL PRIVILEGES ON DB이름.* TO 'ssluser'@'%' REQUIRE SSL;
Query OK, 0 rows affected (0.001 sec)

MariaDB [(none)]> flush privileges;
Query OK, 0 rows affected (0.001 sec)

MariaDB [(none)]>
7. 외부컴퓨터에서 서버에 SSL접속 확인하기
7-1) 일반 접속 실패 확인
C:\Users\사용자>mysql -h서버주소 -ussluser -p
Enter password: **********
ERROR 1045 (28000): Access denied for user 'ssluser'@'_gateway' (using password: YES)
7-2) SSL 접속 성공 확인
C:\Users\사용자>mysql --ssl -h서버주소 -ussluser -p
Enter password: **********
Welcome to the MariaDB monitor.  Commands end with ; or \g.
Your MariaDB connection id is 506
Server version: 10.3.22-MariaDB-1ubuntu1-log Ubuntu 20.04

Copyright (c) 2000, 2018, Oracle, MariaDB Corporation Ab and others.

Type 'help;' or '\h' for help. Type '\c' to clear the current input statement.

MariaDB [(none)]> status;
--------------
mysql  Ver 15.1 Distrib 10.5.4-MariaDB, for Win64 (AMD64), source revision 5018b998a76b99a30efe96ca007a95a5a1c83bb5

Connection id:          506
Current database:
Current user:           ssluser@_gateway
SSL:                    Cipher in use is AES256-SHA
Using delimiter:        ;
Server:                 MariaDB
Server version:         10.3.22-MariaDB-1ubuntu1-log Ubuntu 20.04
Protocol version:       10
Connection:             ddart.net via TCP/IP
Server characterset:    utf8mb4
Db     characterset:    utf8mb4
Client characterset:    euckr
Conn.  characterset:    euckr
TCP port:               3306
Uptime:                 16 min 28 sec

Threads: 12  Questions: 9629  Slow queries: 0  Opens: 239  Flush tables: 1  Open tables: 233  Queries per second avg: 9.745
--------------

MariaDB [(none)]>
mysql 접속후 status 에서
SSL: Cipher in use is AES256-SHA
을 보면 현재 SSL 접속상태인지 아닌지 알수 있다. SSL이 아니면 'Not in use' 라고 표시된다.
7-3) mysql client 설정
3번과정에서 만든 ca-cert.pem, client-cert.pem, client-key.pem 을 외부접속할 클라이언트 PC로 다운받는다.
mysql client 설정에서 이 인증키들을 설정해주면 그냥 접속해도 ssl로 접속된다.
클라이언트 PC가 윈도우일 경우
C:\Program Files\MariaDB 10.5\data\my.ini
[client]
port=3306
plugin-dir=C:/Program Files/MariaDB 10.5/lib/plugin
ssl-ca=C:\Program Files\MariaDB 10.5\certs\ca-cert.pem
ssl-cert=C:\Program Files\MariaDB 10.5\certs\client-cert.pem
ssl-key=C:\Program Files\MariaDB 10.5\certs\client-key.pem
에 추가해준다.
클라이언트 PC가 리눅스일경우
/etc/mysql/mariadb.conf.d/50-mysql-clients.cnf
[mysql]
# Default is Latin1, if you need UTF-8 set this (also in server section)
default-character-set = utf8mb4
ssl-ca=/etc/mysql/certs/ca-cert.pem
ssl-cert=/etc/mysql/certs/client-cert.pem
ssl-key=/etc/mysql/certs/client-key.pem
로 변경해준다.
이제 그냥 ssl 옵션없이
mysql -h서버주소 -u사용자 -p 로 접속해도 접속후 status 정보보면
MariaDB [(none)]> status;
--------------
mysql  Ver 15.1 Distrib 10.1.44-MariaDB, for debian-linux-gnueabihf (armv7l) using readline 5.2

Connection id: 1918
Current database:
Current user: ddartssl@61.98.230.101
SSL: Cipher in use is DHE-RSA-AES256-SHA
Current pager: stdout
Using outfile: ''
Using delimiter: ;
Server: MariaDB
Server version: 10.3.22-MariaDB-1ubuntu1-log Ubuntu 20.04
Protocol version: 10
Connection: ddart.net via TCP/IP
Server characterset: utf8mb4
Db     characterset: utf8mb4
Client characterset: utf8mb4
Conn.  characterset: utf8mb4
TCP port: 3306
Uptime: 1 hour 57 min 30 sec

Threads: 14  Questions: 93126  Slow queries: 0  Opens: 251  Flush tables: 1  Open tables: 245  Queries per second avg: 13.209
처럼 SSL 접속이 됨을 알수 있다.
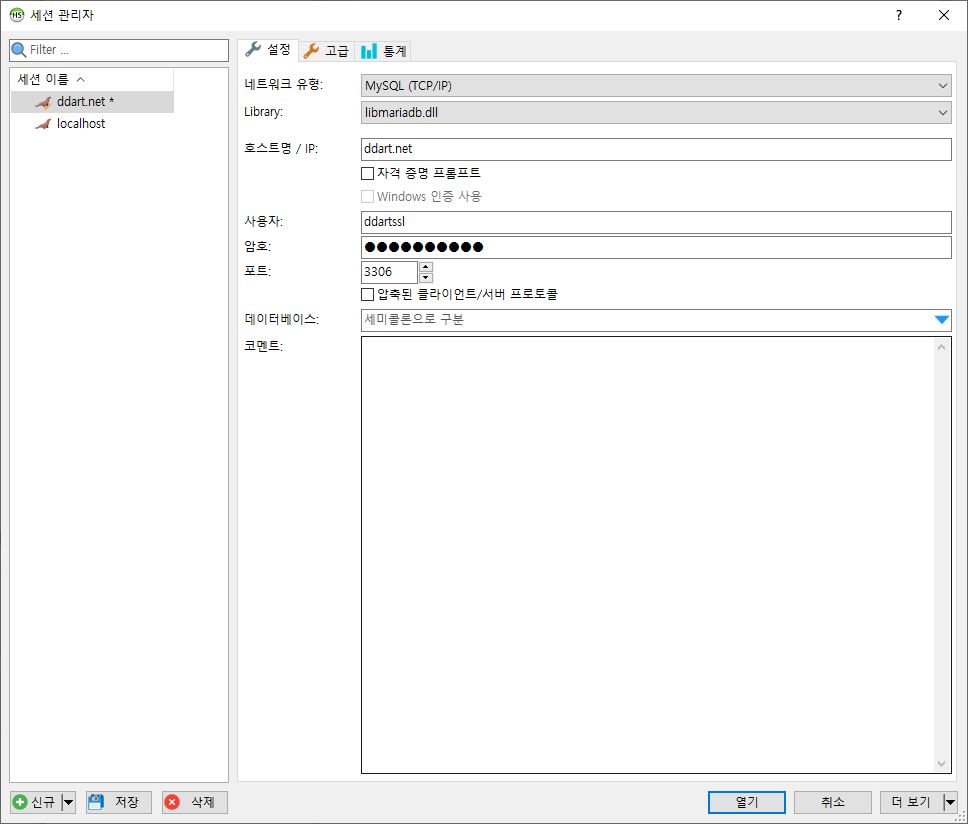
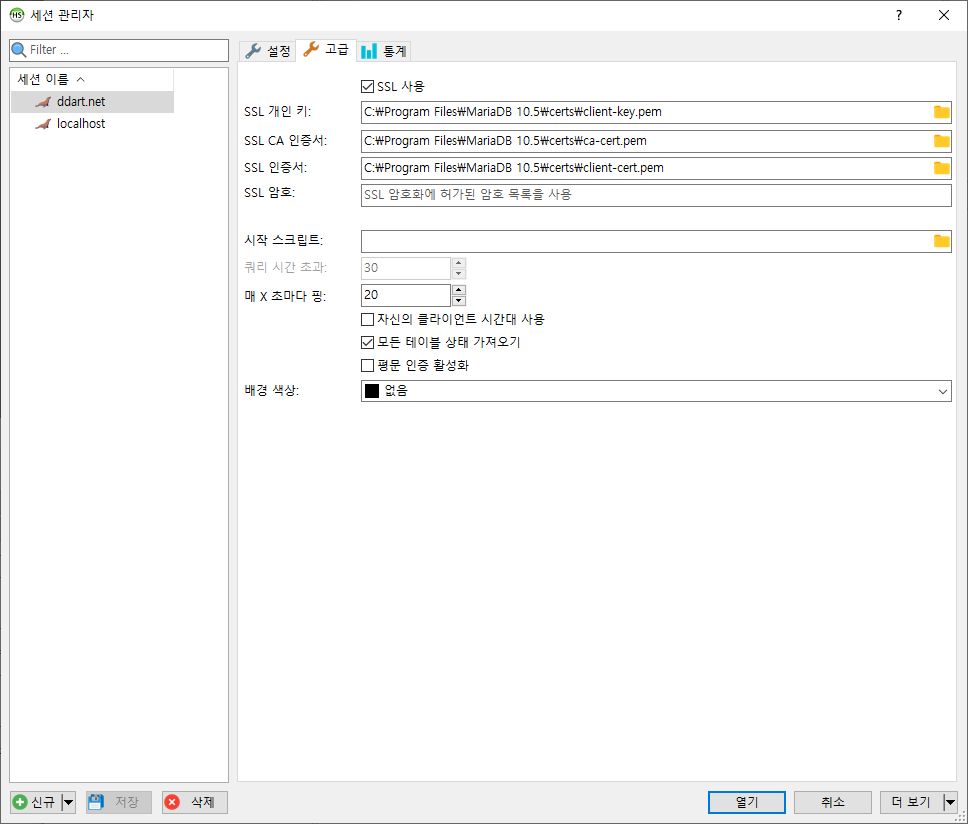
MariaDB 윈도우용 GUI클라이언트 HeidiSQL 에서도


와 같이 설정한다.
7-4) libmariadb.dll 라이브러리에서 SSL 사용하는 C++ 콘솔 예제
mysql_real_connect 하기전에 mysql_ssl_set 나 mysql_options 로 인증키 설정해줘야한다.
#include <iostream>
#include "mysql.h"
#pragma comment(lib, "libmariadb")
int main()
{
  MYSQL *connection, mysql;
  mysql_init(&mysql);
  mysql_ssl_set(&mysql, "certs/client-key.pem", "certs/client-cert.pem", "certs/ca-cert.pem", NULL, NULL);
  connection = mysql_real_connect(&mysql, "ddart.net", "ssluser", "password", "dbname", 0, 0, 0);
  if (connection == NULL)
    cout << mysql_error(&mysql) << endl;
  else
    cout << mysql_get_ssl_cipher(&mysql) << endl;
}
8. 서버간 replication 에 ssl 적용
https://ddart.net/xe/board/12179
에서 설명한 mysql master 서버와 slave 서버사이 동기화할때도 모든게 노출되는 일반접속보다 ssl 설정을 하는게 좋다.
8-1. 마스터 서버
위에서 설명한 서버에서 설정과 동일하다.
8-2. 슬레이브 서버
클라이언트 PC처럼 동작하므로
마스터 서버에서 위3번 과정에서 만든 ca-cert.pem, client-cert.pem, client-key.pem 을
슬레이브 서버의 /etc/mysql/certs 디렉토리에 복사하고 소유권을 mysql:mysql로 바꿔준다.
그런후 슬레이브 서버에
mysql -uroot -p 로 루트 접속후
MariaDB [(none)]> stop slave;
Query OK, 0 rows affected (0.06 sec)

MariaDB [(none)]> CHANGE MASTER TO MASTER_HOST='서버주소', MASTER_USER='replication_user', MASTER_PASSWORD='비밀번호',  \
MASTER_LOG_FILE='master1-bin.000020', MASTER_LOG_POS=1010814, \
MASTER_SSL=1, \
MASTER_SSL_CA = '/etc/mysql/certs/ca-cert.pem', \
MASTER_SSL_CERT = '/etc/mysql/certs/client-cert.pem', \
MASTER_SSL_KEY = '/etc/mysql/certs/client-key.pem';

MariaDB [(none)]> start slave;
Query OK, 0 rows affected (0.00 sec)

MariaDB [(none)]> SHOW SLAVE STATUS \G;
*************************** 1. row ***************************
               Slave_IO_State: Waiting for master to send event
                  Master_Host: ddart.net
                  Master_User: replication_user
                  Master_Port: 3306
                Connect_Retry: 10
              Master_Log_File: master1-bin.000020
          Read_Master_Log_Pos: 1697766
               Relay_Log_File: master1-relay-bin.000009
                Relay_Log_Pos: 11044
        Relay_Master_Log_File: master1-bin.000020
             Slave_IO_Running: Yes
            Slave_SQL_Running: Yes
              Replicate_Do_DB:
          Replicate_Ignore_DB:
           Replicate_Do_Table:
       Replicate_Ignore_Table:
      Replicate_Wild_Do_Table:
  Replicate_Wild_Ignore_Table:
                   Last_Errno: 0
                   Last_Error:
                 Skip_Counter: 0
          Exec_Master_Log_Pos: 1697766
              Relay_Log_Space: 23829
              Until_Condition: None
               Until_Log_File:
                Until_Log_Pos: 0
           Master_SSL_Allowed: Yes
           Master_SSL_CA_File: /etc/mysql/certs/ca-cert.pem
           Master_SSL_CA_Path:
              Master_SSL_Cert: /etc/mysql/certs/client-cert.pem
            Master_SSL_Cipher:
               Master_SSL_Key: /etc/mysql/certs/client-key.pem
        Seconds_Behind_Master: 0
Master_SSL_Verify_Server_Cert: No
                Last_IO_Errno: 0
                Last_IO_Error:
               Last_SQL_Errno: 0
               Last_SQL_Error:
  Replicate_Ignore_Server_Ids:
             Master_Server_Id: 1
               Master_SSL_Crl: /etc/mysql/certs/ca-cert.pem
           Master_SSL_Crlpath:
                   Using_Gtid: No
                  Gtid_IO_Pos:
      Replicate_Do_Domain_Ids:
  Replicate_Ignore_Domain_Ids:
                Parallel_Mode: conservative
1 row in set (0.00 sec)
